User Guide
- System Requirements
- Creating a SUSE Account
- Logging In to SUSE Customer Center
- Managing Account Information
- Understanding the Dashboard
- Working with Organizations
- How Organizations Are Created for You
- Belonging to Multiple Organizations
- Switching to Another Organization
- Requesting Access to an Organization’s Account
- Working with Users
- Adding Users to an Organization
- Granting Admin Privilege to Users of your Organization
- Enabling and disabling support
- Removing Users from an Organization
- Activating and Managing Subscriptions
- Managing Registered Systems
- Finding Patches
- Labeling Systems
System Requirements Back to top
You can access SUSE Customer Center with any browser, but we have optimized our application for the latest version of Firefox and Chrome.
The SUSE Customer Center might work with Internet Explorer 11, Edge, Safari and older versions of Firefox and Chrome. However, it has not been tested with these browsers.
Creating a SUSE Account Back to top
If you do not have a SUSE account, you must create one the first time you log in to SUSE Customer Center:
- Click here to create your SUSE user account.
- Fill in the required information and click "Create Account".
Once you have a SUSE account, you can log in to the SUSE Customer Center.
Logging In to SUSE Customer Center Back to top
- Go to the SUSE Customer Center.
- Click "Log in".
You must have a SUSE account to be able to access SUSE Customer Center. If you do not have an SUSE account yet, follow the instructions presented in Creating a SUSE Account.
Managing Account Information Back to top
Your personal account information includes details such as your name and contact information. This information is stored as part of your SUSE account.
Click here to edit your account information. You will be redirected to a page that allows you to change your SUSE credentials.
Understanding the Dashboard Back to top

SUSE Customer Center gives you a single location from which you can manage your products and subscriptions, view and manage your installed systems, and perform various other actions that help you manage your accounts.
The dashboard shows you a snapshot of your products, subscriptions, systems, and alerts. The sidebar on the left is the main means of navigation that will help you find your way within SUSE Customer Center.
In addition, there is a horizontal, contextual menu at the top of the page that helps you navigate within the context of your organizations. There are five areas of information accessible from here:
- Dashboard : This area gives you an overview of your purchased subscriptions, their usage and the recent activities.
- Users : This area gives you an overview of the members of your organization. Organization admins can invite and remove other users, entitle them for support, and more.
- Subscriptions : This area shows you the number of your organization’s subscriptions. At the moment, the total number of subscriptions includes paid, evaluation and OEM subscriptions.
- Systems : This area gives you an overview of your registered systems.
- Registration Proxies : This area gives you an overview of the Registration Proxies (SMT, RMT, SUSE Manager) used in your organization. Each Registration Proxy will be identified via its Unique ID and last check-in. Also you can see the number of systems registered behind each Proxy, if you have enabled this feature locally.
The dashboard page also provides quick access to detailed information about your product subscriptions. The highlighted values represent the amount of subscriptions for each product.
Clicking on one of these values takes you to a summary page displaying your subscriptions of the respective product.
Working with Organizations Back to top
If you are an organization admin, you can specify who has access to information about products, subscriptions, and other services that are listed for your organization. For information on adding organization admins, see Granting Admin privilege to Users of your Organization
The following sections provide more information:
- How Organizations Are Created for You
- Belonging to Multiple Organizations
- Switching to Another Organization
- Requesting Access to an Organization’s Account
How Organizations Are Created for You Back to top
In SUSE Customer Center, accounts are placed into organizations. For example, an organization can represent a company and contain the systems and subscriptions registered to that company.
When you create a login account, you are added to a company’s organization if either of the following is true:
- The subscription was purchased under a contract tied to that company
- An organization admin added you as an organization user or admin
When you request a trial for a product for the first time, a dedicated organization called "Evaluation Subscriptions" is created for you
Belonging to Multiple Organizations Back to top
A user can be associated with multiple organizations in the SUSE Customer Center. For example, this is useful if a reseller needs to use a single SUSE Customer Center login to view and manage information for multiple customers.
A user’s role and access to information changes when switching to a different organization, based on the user’s assigned roles in that organization. For information about the available roles, see the section on who should use SUSE Customer Center.
Switching to Another Organization Back to top
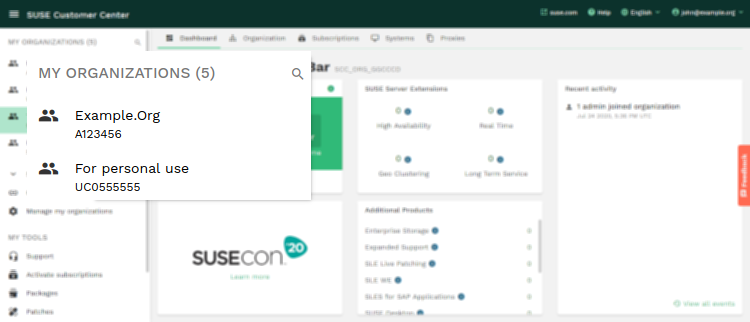
In the top section of the sidebar, select and click on the organization you want to switch to. You can also hover over "My Organizations" and start typing to search for an organization.
NOTE: You can easily switch to another organization from within several SUSE Customer Center pages using the sidebar menu. For example, if you are viewing the systems for one of your organizations, you can quickly switch to the systems information for another organization.
Requesting Access to an Organization’s Account Back to top
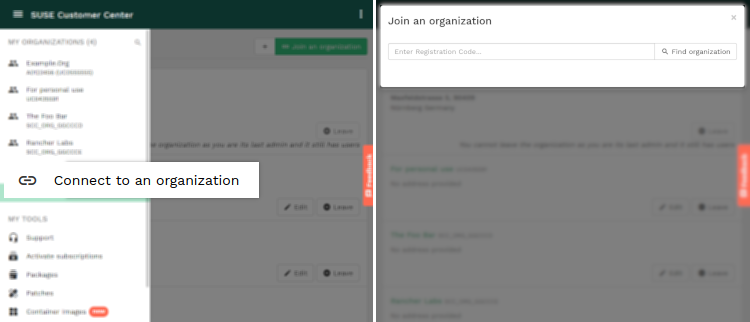
Under the list of your organizations in the sidebar, select "Connect to an Organization" and insert a Registration Code connected to the other organization. In case you don’t have one, please contact your organization admin.
Click on "Find Organization". This will look up the organization by the registration code you entered and show you some basic information about it.
The request is automatically processed, and you will be informed about the status of your request.
Working with Users Back to top
In many organizations, more than one person needs access to system information. For example, the organization’s purchasers and IT administrators might need information about the organization’s account.
SUSE Customer Center defines two types of users:
- Organization admins control rights for the entire organization. They can add users, grant administrator rights to others, and have administrative rights to all subscriptions for that organization.
- Organization users have activated a system by using a subscription owned by the organization or have been granted rights to other subscriptions by an organization admin. User access to the site is limited to information about that particular system unless the organization admin grants rights to other subscriptions or systems.
The following sections provide more information:
- Adding Users to an Organization
- Granting Admin privilege to Users of your Organization
- Removing Users from an Organization
Adding Users to an Organization Back to top
SUSE Customer Center enables you to give access to your organization’s information to anyone you choose. This can include co-workers, other interested people in your company, your SUSE sales representatives or resellers.
NOTE: You can add any user to your organization by entering a valid e-mail address. However, to access SUSE Customer Center, each user must have a login account using the e-mail address you have assigned. Users can create a SUSE login account the first time they access SUSE Customer Center, as described in “Logging In to SUSE Customer Center.”
- Log in to SUSE Customer Center as described in the relevant section.
- (Optional) Switch to the organization you want to view as described in the relevant section.
- Click on “Users” in the top contextual menu.
- Click on "Invite new User" on the right side of the page.
- To invite a user to your organization, add their e-mail address in the invitation box. Here you can also find information about pending invitations.
An e-mail will be sent to the invited user with further details about how to create an account.
Granting Admin privilege to Users of your Organization Back to top
Organization admins can grant admin privileges to other users of the organization.
- Log in to SUSE Customer Center as described above.
- (Optional) Switch to the organization you want to view as described in the relevant section.
- Click on “Users” in the top contextual menu.
- Click on the check box under the Admin column for the respective user and confirm by clicking on "Grant admin privileges" in the dialogue.
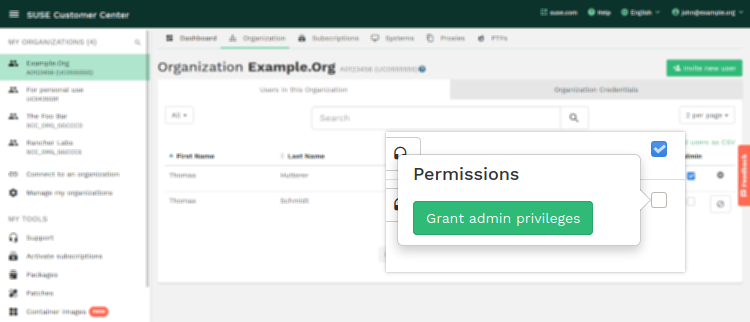
The user will now have Admin rights and its icon will change from gray to green.
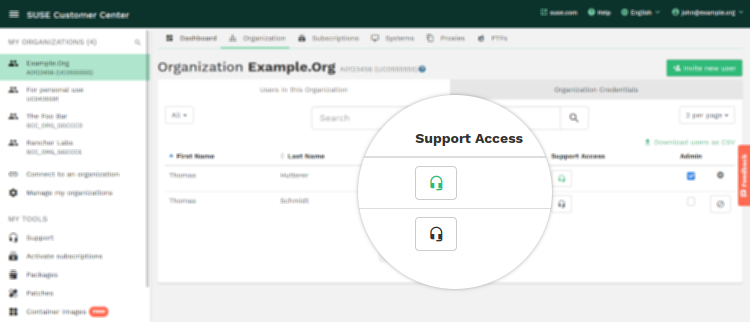
Enabling and disabling support Back to top
In order to enable or disable support for a user you need to be an administrator in your organization. There are different cases where you may have to do so:
- Support isn’t enabled for a user in your organization.
- Support is enabled for a user in your organization but the organization doesn’t appear in the support ticket form dropdown.
Enabling or disabling support for a user in your organization is handled in the “Users” page. You’ll see a list of users in your organization.
The "Support Access" icon determines whether support is disabled or enabled for a user. You need to click on the headset icon in order to enable or disable support for a user:
Removing Users from an Organization Back to top
To remove a user from an organization
- Log in to SUSE Customer Center as described above
- (Optional) Switch to the organization you want to view as described in the relevant section.
- Click on “Users” in the top contextual menu.
- Select the user from the available list and click on the minus button on the right side.
- Confirm by clicking on "Remove" in the dialogue.
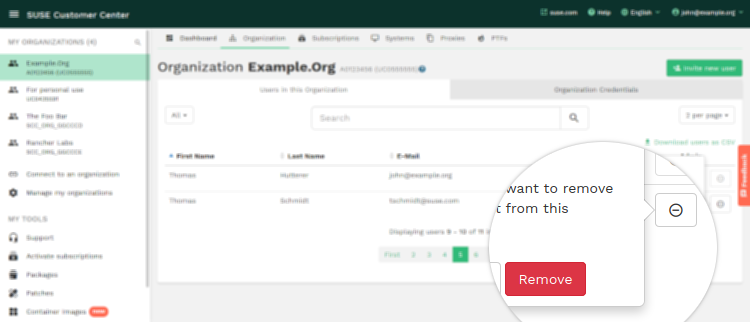
NOTE: In case you are the only admin of your organization, you will not be able to delete yourself. Please consider adding a new organization admin before proceeding with the removal process.
Activating and Managing Subscriptions Back to top
When you purchase a subscription, it is automatically added to the Subscriptions page in SUSE Customer Center. The primary contact on the order receives an e-mail upon purchase. Click the URL in the e-mail and follow the instructions on the page to get your Registration Code. At this point, you can use SUSE Customer Center to manage your subscription as described in this section.
Activating a Retail or OEM Purchased Product or Subscription
Before using your registration code please activate it using the SUSE Customer Center.
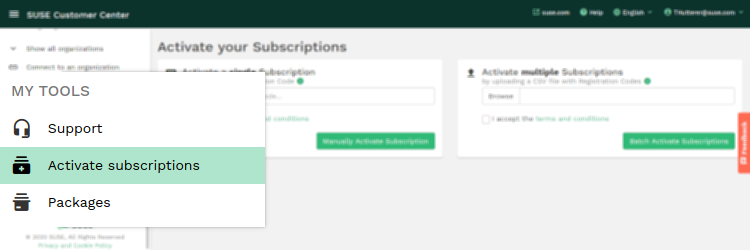
- Log in to SUSE Customer Center as described above
- In the sidebar on the left, find the "My Tools" section and select "Activate subscriptions"
- On the page, you can activate your subscriptions either by entering a single registration code, or by uploading a CSV file with multiple registration codes. The next step is to associate the subscription(s) with an organization. You can select an organization that you are a member of, or create a new one.
Viewing Basic Information about Your Subscription
You can view basic information about your product or subscription, including the following:
- Start and expiry date
- Registration Code
- Number of registered systems
- Number of available systems
- Associated products for each subscription.
This can be achieved by following these steps:
- Log in to SUSE Customer Center as described above
- (Optional) Switch to the organization you want to view as described in the relevant section.
- Click on “Subscriptions” in the top contextual menu.
This will take you to a list of all your subscriptions.
Here you can easily check the usage of each subscription by looking at the system column. There you will find something like “x/y of z”, where x is the number of physical systems, y is the number of virtual systems, and z is the number of purchased items.
For each subscription, the SUSE Customer Center will notify you about its upcoming or past expiration. In case you would like to mute these notifications, click on the three dots icon at the end of the respective row and select "Mute".
By clicking on a subscription's name, you will be redirected to a dedicated page where you can see additional information regarding the products.
This detailed page includes 3 sections:
- Overview
- Base and Extension Products
- Order History
The "Overview" page briefly presents minimal information about your subscription, such as: Registration Code, start and end date, and number of registered systems.
Click on the "Base and Extension Products" tab to list all the products that are included in your subscription. By clicking on the product name you can see a list of available repos that you are able to mirror with your subscription.
If you have received an invoice from us, click on the "Order History" tab to view more information including order numbers and under which order each subscription was booked.
NOTE: In case you only see “Order History: This information is not available” this means that your subscription is either a trial or it was purchased via a SUSE OEM partner.
Managing Registered Systems Back to top
A system, in the context of the SUSE Customer Center, is any device that is using a SUSE product and is connected via registration to SUSE Customer Center.
You can view and edit information for your systems by following these steps:
- Log in to SUSE Customer Center as described above
- (Optional) Switch to the organization you want to view as described in the relevant section.
- Click on “Systems” in the top contextual menu.
This will take you to a list of all your registered systems. To view details of a specific system, click on the hostname in the respective row.
For details about registering SUSE Linux Enterprise 12+ products, refer to this knowledge base article.
De-registering systems
Organization admins can delete systems registered in their organization in the SUSE Customer Center. Deleting/de-registering a system removes it from its subscriptions and frees up an entitlement.
Note: If you de-register a system that is behind a registration proxy (RMT or SUSE Manager), you will also need to remove it from the registration proxy itself. Otherwise, active systems will reappear in the SUSE Customer Center.
Finding Patches Back to top
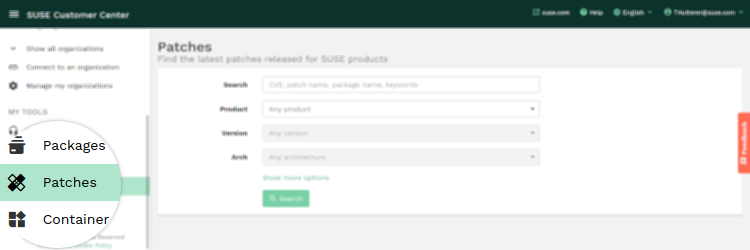
Whenever you're looking for a list of patches for a specific product, for a patch for a specific bug or vulnerability, or want to get an overview over patches released last month, Patch Finder will help you find what you're looking for.
You can narrow your search down to a specific product, version, and architecture. Further options allow you to limit the results to patches for security vulnerabilities, to patches for bugs of a certain severity, or to patches released in a certain time frame.
Result list
Severity, Patch name, Product(s), Architecture, and Release Date are displayed for every patch that matches the search criteria.
Download
A click on the patch name takes you to the details page for that patch. This page links to relevant CVEs, bug entries, and to the patch itself.
Labeling Systems Back to top
Labels are managed at the organization level. You can create labels for your organization and assign them to any system within it. You can use these labels to search and filter systems, thereby allowing a custom approach to categorize systems within your organization.
You can manage your labels in multiple ways:
- In the SUSE Customer Center
- The SCC API
- SUSEConnect
Manage labels in the SUSE Customer Center
Go to your organization's systems page. There, you can get started with labeling your systems.- Create and manage labels: Select one or more systems and click on the "Assign labels" button. The "Manage labels" button displayed in the dropdown will redirect you to the label management page. You can create, view, delete and update all the labels within your organization here.
- Assign/remove labels from a system: Select one or more systems. This enables the "Assign labels" button. You can select labels in the dropdown to assign them and unselect to remove them from the system. Click anywhere outside the dropdown to save your changes.
- Filter systems by one or more labels: Click on the "Labels" button to filter systems by labels assigned to them. You can select multiple labels for filtering.
- Search systems by a label: You can also type the label name in the search bar to list all systems with that label assigned to them.
Manage labels via SCC API
-
To create, update, view and delete labels within your organization, use the
/organizations/labelsAPI endpoints. -
To assign and un-assign labels from your systems, use the
/systems/labelsAPI endpoints.
Please see the API documentation to learn more.
Manage labels via SUSEConnect
You can assign labels to your system via SUSEConnect during registration using the --set-labels flag. It accepts a comma separated list of labels as shown below.
sudo SUSEConnect -r REGISTRATION_CODE --set-labels production,"Project: test instance"
For more details, see the installer documentation.